Buttermilk Brown Sugar Walnut Pecan Scones

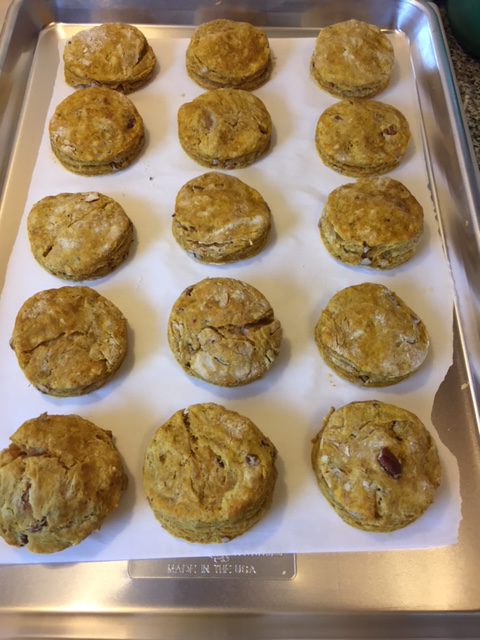
I had made some buttermilk dried cherry scones a few weeks ago. I’d never used buttermilk in a scone recipe, so I wasn’t sure how they’d turn out. They turned out great! Honestly, I didn’t notice a difference between using heavy cream and buttermilk. One thing that you still need to remember is to not overwork the dough. If it gets too warm, pop it in the freezer for 10 minutes. I have a TON of pecans and walnuts (giant bags in my freezer that my parent’s bought for me) and toasted them in a bit of butter for these scones. Oh, and extra cold butter is key. Freeze a stick of unsalted butter for 20 min or so. These scones are not overly sweet either. I like the addition of the toasted nuts with the hint of brown sugar. I had one with my coffee this morning and it was delicious. (Okay, who am I kidding? I had a scone yesterday, shortly after I took them out of the oven).

buttermilk brown sugar walnut pecan scone dough

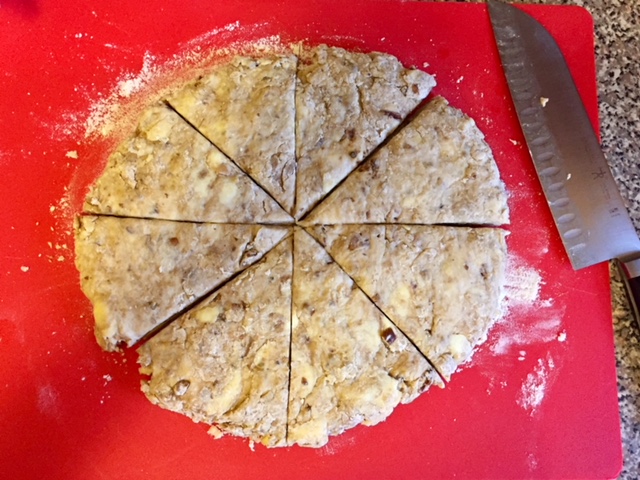
This is the first time I’ve ever rolled a perfect circle. Amazing!


Buttermilk brown sugar walnut pecan scones fresh from the oven

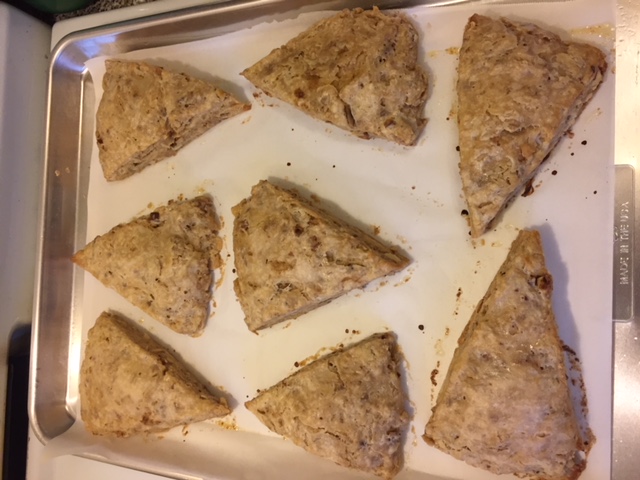
Scones fresh from the oven.

  • 2 C AP flour
  • 1/3 C brown sugar
  • 1 TB baking powder
  • 1/2 tsp salt
  • 1/2 C unsalted butter
  • 3/4 C buttermilk
  • 1/2 C toasted pecans and walnuts
  • 2 TB buttermilk for brushing on top of scones before baking
  • Demerera sugar for sprinkling on top of the scones before baking (optional)

Preheat oven to 425 degrees

Mix dry ingredients together in large bowl. Cut ice cold butter into cubes and use a pastry blender or your hands to combine. Get to the point where the butter is about the size of peas. Add the buttermilk and the toasted nuts. Use a spatula to mix everything together. There might be some craggly bits, and if so, add a tiny splash of buttermilk. If the dough is too warm from all the mixing, pop it in the freezer for 10-15 minutes. Turn the dough out onto a lightly floured countertop or cutting board. Flatten the dough into about a 7-8 inch round circle. Cut dough into 8 wedges and put on a baking sheet lined with parchment paper. Brush scones with that two tablespoons of buttermilk and sprinkle some sugar on top (I didn’t put sugar on them, but, I might next time). Bake for 12 to 14 minutes, or, until ever-so-slightly golden. You don’t want to over-bake them because they’ll be dry. No one wants dried out scones.

Just a Note…

My Instagram feed is more up-to-date than the blog. I need to get better at writing posts. Though, I don’t think anyone actually follows or subscribes to this blog besides my Mom (thanks, Mom!). I’ll put up a post shortly for the Buttermilk Brown Sugar Walnut Pecan Scones that I just made….
You can also follow me on Instagram…just click that widget/button!

Spiced Pumpkin Pecan Biscuits, Take 3

pumpkin pecan biscuits

I think I fixed it!

Third time’s a charm, right? *shrugs* who knows. BUT, I do know that these were very tasty with my coffee this morning. And, your apartment will smell really good and all Christmas-y/Festivus-y while they’re baking.

Spiced Pumpkin Pecan Biscuits

  • 2 C. AP flour
  • 2 TB baking powder
  • 1 tsp baking soda
  • 1 tsp salt
  • 1 1/2 tsp pumpkin pie spice
  • 6 TB chilled butter, cut into cubes
  • 3/4 C. canned pumpkin
  • 1/3 C. buttermilk
  • Dash of vanilla
  • 2 TB dark brown sugar, OR, 3TB of honey
  • 1/2 C. chopped, toasted pecans (in 2 TB of butter)

Heat oven to 400 degrees. Chop and toast pecans in a skillet in two tablespoons of butter, set aside to cool. Combine dry ingredients in large bowl, cut in butter with a pastry cutter or, with hands, until butter is the size of peas or tiny pebbles, set aside (If you’ve handled it too much and the butter pieces are warm, chill the dry ingredients while you deal with the wet ingredients). In a medium sized bowl, whisk the buttermilk and brown sugar (or honey), add vanilla and pumpkin. Stir until combined. Add wet ingredients to dry and stir in toasted pecans. If you find that the dough is a little sticky, don’t worry, add a little flour and use your hands or a spoon to mix it. Turn out dough onto a well-floured surface and press into a rectangle until the dough is about 1 inch thick all around. Also, try not to overwork the dough, as the butter will warm up (which you don’t want). If the dough becomes too warm or sticky, pop it in the freezer for a few minutes. Press biscuit cutters into dough(don’t twist, or else the biscuits won’t have layers) and place onto the parchment-lined baking sheets. The dough makes about 12-16 biscuits. Bake for about 10-12 minutes or, until ever-so-slightly golden brown. You don’t want to over-bake them and dry them out. You’ll be able to tell when they’re done. Serve warm with some whipped honey, or, like I did, with butter. Store in air-tight container in the refrigerator or, wrap up in wax paper and foil in a ziplock bag and store in the freezer. You’ll thank me.

Fire Roasted Tomato Soup

fire roasted tomato soup

Mmmm, perfect tomato soup for a cold night.

fireroastedtomatosoup2

Add a dollop of pesto and some cheeeeeze!

My mom made this soup when I was recently home for a visit. It is perfect with some crusty bread and a glass of red wine. My version omitted the celery tops (because I rarely buy celery), but it is good with the celery and I used dried basil because I forgot to buy fresh basil (whoops!). The addition of sun-dried tomatoes gives the soup a nice depth. Anyway, I got to use my immersion blender which is one of my favorite kitchen tools ever.

Fire Roasted Tomato Soup

  • 1TB butter
  • 2 shallots, minced
  • 1 clove of garlic, minced
  • 3/4C finely chopped carrots
  • 1tsp sugar
  • 1TB dried basil or 10 large basil leaves, torn
  • 4 sun-dried tomato halves, packed in oil
  • 1 28oz can of fire roasted tomatoes
  • chopped celery tops
  • 1 14oz can of vegetable broth
  • salt and pepper
  • dollop of pesto (to add on top when served, if desired)

Melt butter in stock pot or Dutch oven over medium heat. Add shallots, garlic and carrots. Cook for 5 minutes, or, until soft. Add the sugar, basil, celery tops and salt and pepper, cook for 5 more minutes. Then add the canned tomatoes and sun-dried tomatoes and broth. Stir and let simmer for about an hour. Check on it occasionally and stir. Remove from heat and use an immersion hand blender to puree the soup (or, you can use a blender instead). Pour soup into bowls, dollop with pesto and a little bit of Pecorino or parmesan cheese. Enjoy!

Refrigerator Pickles

Yes, I do own a Paul Frank Pickle Pants wallet. It’s one of my favorite Paul Frank designs ever.

Paul Frank pickle wallet

My coveted Paul Frank wallet.

I loved pickled vegetables. Okra? Yes. Green Beans? Check. Carrots? Peppers? Yes! But mostly, I love pickles in their original cucumber form. My grandma used to can pickles and beets and store them in her cellar. That was an all day process and I didn’t really want to do that right now. I wanted something that could be made quickly and easily. So, I decided to make some refrigerator pickles. I started with plain, dill pickles:

first foray into refrigerator pickles!

My very first jar of pickles, ready to go into the fridge.

They turned out really well. So, I decided to make a couple more jars: dill and then a jar of spicy garlic pickles:

Spicy garlic pickles.

Spicy garlic pickles.

You can make as little or as much as you wish. It’s only me here, so, I make one or two jars at a time. These keep in the fridge for a week. This recipe doesn’t require sterilizing jars and lids, but, please make sure you have super clean jars/lids. I used Ball 16oz mason jars.

Quick and Easy Refrigerator Pickles

  • 2-3 Kirby cucumbers, thoroughly washed
  • 1-2 TB salt
  • White distilled vinegar
  • sprig of dill, chopped

Wash the cucumbers and slice into 1/8th inch pieces, pack tightly into the jar until they reach the lip of the jar. Pack those suckers down. Add the dill and salt (you may want to start out with less salt, it’s up to you. You can also add a clove of garlic or teaspoon of crushed red pepper flakes if you’re making spicy pickles). Then, pour vinegar over cucumbers, leaving a little room at the top. Screw lid on tightly and shake jar to mix up salt, dill, etc. Put in refrigerator and remember to shake the jar every few hours. You will have pickles in about 4-5 hours, or, leave overnight and enjoy the next day. Really, you can’t go wrong here.

dill & spicy garlic pickles

Sunday pickle making. Yay!